Sunday, August 08, 2010

Partial Methods in C#

While experimenting with ASP.NET MVC 2 – I’m working through “Professional ASP.NET MVC 2” - I also took a lock at some of the generated code. I do this out of curiosity as sometimes I find something that I can use later for my own code as well.

This time I discovered partial methods when I checked out the designer code for the entity framework (EF) model. In the class NerdDinnerEntities you will find the following:

#region Partial Methods
    
partial void OnContextCreated();
    
#endregion

Partial methods work to some degree like delegate registered for an event but with less overhead for very special situations. I could have written up the details about this myself, but I found a blog that describes “C# 3.0 – Partial Methods” in a wonderful, easy-to-understand way.

Sunday, August 01, 2010

Using HTTP Response Filter in ASP.NET

In an ASP.NET application if you want to manipulate the HTML code after it has been rendered but before it is being sent back to the client, you can use a custom filter to intercept that stream and modify it according to your needs.

One scenario is injecting elements that in turn can be used by the browser in conjunction with a CSS to modify the visual appearance. Not in all cases you have access to the source code for the pages.

To demonstrate how to do that I’ll use a simple PassThroughFilter that simply forwards all method calls to the original filter.

Let me show you first how you can register the filter. There are many different places, essentially everywhere where the HttpContext.Response object is accessible. Throughout the processing of a request there are multiple events that you can use to plug in your filter. You can find a list of those events in an article that describes using an HTTP Module for implementing an intercepting filter.

But you don’t have to use an HTTP Module. You can implement your filter and then register it in various places, for example in the pages OnInit(EventArgs) override:

protected override OnInit(EventArgs e) {
   Response.Filter = new PassThroughFilter(Response.Filter);
   base.OnInit(e);
}

Another option is to use the global application object for the registration (:

public class MvcApplication : HttpApplication {
   protected void Application_Start() {
      AreaRegistration.RegisterAllAreas();
      RegisterRoutes(RouteTable.Routes);
   }

   protected void Application_BeginRequest() {
      Response.Filter = new PassThroughFilter(Response.Filter);
   }

   private static void RegisterRoutes(RouteCollection routes) {
      routes.IgnoreRoute("{resource}.axd/{*pathInfo}");

      routes.MapRoute(
          "Default", // Route name
          "{controller}/{action}/{id}", // URL with parameters
          new { controller = "Home", action = "Index", id = UrlParameter.Optional } // Parameter defaults
      );

   }
}

In this example I’m showing this in an MVC 2 based application but the same works for a WebForms based application, too.

Where you intercept depends on your specific requirements. Once you have the basic interception in place you can manipulate the HTML stream before it is sent back to the client.

So here is the full source code for the PassThroughFilter class. Happy Coding!

using System.IO;

namespace WebPortal {
   internal class PassThroughFilter : Stream {
      public PassThroughFilter(Stream originalFilter) {
         _originalFilter = originalFilter;
      }

      #region Overrides of Stream

      public override void Flush() {
         _originalFilter.Flush();
      }

      public override long Seek(long offset, SeekOrigin origin) {
         return _originalFilter.Seek(offset, origin);
      }

      public override void SetLength(long value) {
         _originalFilter.SetLength(value);
      }

      public override int Read(byte[] buffer, int offset, int count) {
         return _originalFilter.Read(buffer, offset, count);
      }

      public override void Write(byte[] buffer, int offset, int count) {
         _originalFilter.Write(buffer, offset, count);
      }

      public override bool CanRead {
         get { return _originalFilter.CanRead; }
      }

      public override bool CanSeek {
         get { return _originalFilter.CanSeek; }
      }

      public override bool CanWrite {
         get { return _originalFilter.CanWrite; }
      }

      public override long Length {
         get { return _originalFilter.Length; }
      }

      public override long Position {
         get { return _originalFilter.Position; }
         set { _originalFilter.Position = value; }
      }

      #endregion

      private readonly Stream _originalFilter;
   }
}

Saturday, July 31, 2010

Updating a Lucene Index – The “Green” Version

There are plenty of examples available on the internet that are good introductions into the basics of a Lucene.NET index. They explain how to create an index and then how to use it for a search.

At some point you’ll find yourself in the situation that you want to update the index. Furthermore you want to update certain elements only.

One option is to throw away the entire index and then recreate it from the sources. For some scenarios this might be the best choices. For example you may have a lot of changes in your data and a high latency for updating the index is acceptable. In that case it might be the cheapest to do a full re-index each time. The trade-off is at different points, e.g. when less than 10% have changed updating can be more time efficient. In some cases you probably want to experiment with this a little.

If you go for recreating the entire index then you probably want to build the new index first (in a different directory if file based) and to replace the index in use only once the new index is complete.

Another option is to update in the index only the documents that have changed (The “green” option as we are re-using the index). This of course would require you to be able to identify the documents that need to be updated. Depending on your application and your design this might be relatively easy to achieve.

If you opt for updating in the index just the documents that have changed then some blogs are suggesting to remove the existing version of the document first and then insert/add the new version of the document. For example the code from the discussion on the question “How to Update a Lucene.NET Index” at Stackoverflow:

int patientID = 12;
IndexReader indexReader = IndexReader.Open( indexDirectory );
indexReader.DeleteDocuments( new Term( "patient_id", patientID ) );

There is, however, another option. Lucene.NET (I’m using version 2.9.2) can update an existing document. Here is the code:

readonly Lucene.Net.Util.Version LuceneVersion = Lucene.Net.Util.Version.LUCENE_29;
var IndexLocationPath = "..." // Set to your location
var directoryInfo = new DirectoryInfo(IndexLocationPath);
var directory = FSDirectory.Open(directoryInfo);
var writer = new IndexWriter(directory, 
            new StandardAnalyzer(LuceneVersion),
            false, // Don't create index
            IndexWriter.MaxFieldLength.LIMITED);
writer.UpdateDocument(new Term("patient_id", document.Get("patient_id")), document);
writer.Optimize(); // Should be done with low load only ...
writer.Close();

Be aware that the field you are using for identifying the document needs to be unique. Also when you add the document, the field has to be added as follows:

doc.Add(new Field("patient_id", id.ToString(), 
                  Field.Store.YES, 
                  Field.Index.NOT_ANALYZED));

The good thing about this option is that you don’t have to find or remove the old version. IndexWriter.UpdateDocument() takes care of that.

Happy coding!

Friday, July 30, 2010

Configuring log4net for ASP.NET

Yes, there are already a few posts out there, and yet I think there is value in providing just a recipe to make it work in your ASP.NET project without too many further details. So here you go (in C# where code is used):

Step 1: Download log4net, version 1.2.10 or later, and unzip the archive

Step 2: In your project add a reference to the assembly log4net.dll.

image

Step 3: Create a file log4net.config at the root of your project (same folder as the root web.config). The following content will log everything to the trace window, e.g. “Output” in Visual Studio:

<configuration>
   <configSections>
      <section name="log4net" type="log4net.Config.Log4NetConfigurationSectionHandler, log4net" />
   </configSections>

   <log4net>
      <appender name="TraceAppender" type="log4net.Appender.TraceAppender" >
         <layout type="log4net.Layout.PatternLayout">
            <param name="ConversionPattern" value="%d %-5p- %m%n" />
         </layout>
      </appender>
      <root>
         <level value="ALL" />
         <appender-ref ref="TraceAppender" />
      </root>
   </log4net>
</configuration>

Step 4: In AssemblyInfo.cs add the following to make the resulting assembly aware of the configuration file:

// Tell log4net to watch the following file for modifications:
[assembly: log4net.Config.XmlConfigurator(ConfigFile = "log4net.config", Watch = true)]

Step 5: In all files in which you want to log add the following as a private member variable:

private static readonly log4net.ILog Log =
   log4net.LogManager.GetLogger(
      MethodBase.GetCurrentMethod().DeclaringType);

Step 6: Log as needed. For example for testing that steps 1 to 5 were successful, add the following in file Global.asax.cs:

public class Global : HttpApplication {
   protected void Application_Start(object sender, EventArgs e) {
      Log.Info("Application Server starting...");
   }
}

For more information about configuring log4net, e.g. logging to files, see log4net’s web site.

As always, if you find a problem with this recipe, please let me know. Happy coding!

Wednesday, July 28, 2010

Wildcard Searches in Lucene.NET

Yes, you can do wild card searches with Lucene.Net. For example you can search for the term “Mc*” in a database with names it will then return names such as “McNamara” or “McLoud”. When you read more details about the query parser syntax (version 3.0.2) you will notice that the wildcard characters * (any number of characters) and ? (one character) are only allowed in the middle or at the end of the search term but not at the beginning.

But how about using wildcards at the beginning? Well you can but you should be aware of the consequences. You have to explicitly switch this on in your code as it comes with an additional performance hit with large indexes. So be careful and see whether the resulting performance is acceptable for your users.

And here is the code (C# in this case):

var index = FSDirectory.Open(new DirectoryInfo(IndexLocationPath));
var searcher = new IndexSearcher(index, true);
var queryParser = new QueryParser(LuceneVersion, "content", new StandardAnalyzer(LuceneVersion));
queryParser.SetAllowLeadingWildcard(true);
var query = queryParser.Parse("*" + searchterm + "*"); // Using wildcard at the beginning
Happy coding!

Monday, July 26, 2010

Lucene Index Toolbox

After you have succesfully created your first index with Lucene.Net you might wonder whether the index was actually created as you wanted. Well, such a tool exists, thanks to the binary compatibility between the Java version and the .NET version of Lucene.

The tool is called Lucene Index Toolbox. It is a Java based tool that allows inspecting file base indexes. To use it:

  1. Download the Lucene Index Toolbox. (This download version 1.0.1, please check for newer versions)
  2. Make sure you have a recent Java runtime installed.
  3. Open a command line for the directory containing the downloaded jar file
  4. Use “java -jar lukeall-x.y.z.jar” to start the tool. Replace x.y.z with the version you downloaded. I used 1.0.1 so the command line for me is: “java -jar lukeall-1.0.1.jar”

Once started you can try out queries against your Lucene index. Or you can have a look at the files of your index and their meaning. Here is an example:

image

A very useful tool in particular for the beginner. Happy coding!

Sunday, July 25, 2010

Visual Studio 2010 and WCF: Hard-to-read Error Message

Just ran into the following error/failure when updating a service reference to a WCF based service:

image

The challenge I had was that I couldn’t see the remainder of the message. Furthermore nothing was selectable in this message box. Ideally the control used for displaying the message should allow for selecting the text and also allow for a scrollbar. I suspect this is the default error message box of the OS. If that is case I think it could be solved by either the Visual Studio or the Windows team.

In my case I launched the ASP.NET application hosting the WCF service and typed in the URL in a browser. That way I got access to the same but now complete error information. “The request failed with the error message:” and “The type ‘xyz’, provided as the Service attribute value in the ServiceHost directive, or provided in the configuration element system.serviceModel/serviceHostingEnvironment/serviceActivations could not be found.” now made sense.

And here is the root cause: Since there was an increasing number of services in the ASP.NET app I decided to create a folder in that project and move the UserManagementService into that folder. With some refactoring I also updated the namespaces and it happily compiled. I even remembered to update the entries in the web.config file. What I did overlook was the markup in the .svc files. So here is a simple example:

imageNote the highlighted part: Initially when I created the service it was sitting in the root and the name of the implementation including the namespace was “Server.UserManagementService”. When moved it into a folder name UserManagement, I forgot to update this markup to “Server.UserManagement.UserManagementService”.

So keep in mind the following when you rename or move a service implementation:

  1. Rename the service
  2. Update the web.config file (this is also mentioned in the comments generated when you use the wizard to add the service)
  3. Update the markup in the associated svc-file.
  4. Update/configure the service references in all service clients.

The last one can be done in two ways: First you remove the service reference and then re-add it. Alternatively you can choose to reconfigure the reference:

image Next, update the address to the service:

image Happy coding!

Wednesday, July 21, 2010

SVN Location of Lucene.NET

I’m probably the last one to notice… And if not, here is the subversion (SVN) repository location of Lucene.NET after it has come out of Apache Software Foundation’s incubator and became a part of Lucene:

https://svn.apache.org/repos/asf/lucene/lucene.net/

In case you want to download the source code, I’m sure you are aware that you want to append either ‘trunk’ or a tag to this URL. Don’t bother looking into branches. As of writing there were none. The latest tag as of writing was version Lucene.Net_2_9_2 (URL in the SVN repository) although the Java version is already at 3.0.

By the way: They also offer binary releases, but the most recent I could find was March 11, 2007. So I guess this means: DYI. Fortunately, that turned out to be straight forward when using Visual Studio 2005 or later (I used VS 2010). Just get the code of tag Lucene.Net_2_9_2 and compile the solution src\Lucene.Net\Lucene.Net.sln. The output is in Bin\Debug or Bin\Release and consists of a single assembly Lucene.Net.dll, which you need to reference in your project.

Sunday, July 18, 2010

Selenium RC and ASP.NET MVC 2: Controller Invoked Twice

Admittedly MVC (as of writing I use ASP.NET MVC 2) has been designed from the ground up for automated testability (tutorial video about adding unit testing to an MVC application). For example you can test a controller without even launching the ASP.NET development web server. After all a controller is just another class in a .NET assembly.

However, at some point you may want to ensure that all the bits and pieces work together to provide the planned user experience. That is where acceptance tests enter the stage. I use Selenium for this, and a few days ago I hit an issue that turned out to be caused by Selenium server version 1.0.3. Here are the details.

The symptom that I observed was that a controller action was hit twice for a single Selenium.Open(…) command. First I thought that my test was wrong, so I stepped through it line by line. But no, there was only one open command for the URL in question. Next I checked my implementation, whether maybe accidentally I had created some code that implicitly would call or redirect to the same action. Again, this wasn’t the case as each time when I hit the break point on the action controller there was nothing in the call stack.

Then I used Fiddler (a web debugging proxy) for a while and yes, there were indeed a HEAD request and a GET request triggered by the Selenium.Open(…) command. And even more interesting, when I ran my complete test suite I found several cases where the GET request was preceded by a HEAD request for the same URL.

The concerning bit, however, was that I couldn’t find a way how to reproduce this with a browser that I operated manually. Only the automated acceptance tests through Selenium RC created this behavior.

For a moment I considered trying to use caching on the server side to avoid executing the action more than once. But then I decided to drill down to get more details. In global.asax.cs I added the following code (Of course you can use loggers other than log4net):

protected void Application_BeginRequest() {
   Log.InfoFormat("Request type is {0}.", Request.RequestType);
   Log.InfoFormat("Request URL is {0}.", Request.Url);
}

private static readonly log4net.ILog Log =
   log4net.LogManager.GetLogger(MethodBase.GetCurrentMethod().DeclaringType);

As a result I was able to track all requests. Of course you wouldn’t want to do this for production purposes. In this case I just wanted to have more information about what was going on. It turned out that Fiddler was right as I found several HEAD requests followed by a GET request.

After some research I came across a discussion about Selenium RC head requests and it turned out that this was a known issue in Selenium server version 1.0.3. As of writing this was fixed in trunk and I thought for a moment about building from trunk but then decided on a different path. And that solution worked as well: Instead of using version 1.0.3 I am now using Selenium Server version 2.0a5 plus the .NET driver from the 1.0.3 package.

So here is what you need to download:

  1. Selenium Remote Control 1.0.3 which includes the .NET driver. Don’t use the server from this download.
  2. Selenium Server Standalone 2.0a5. Use this jar file as your server. The command line at the Windows command prompt changes from “java –jar selenium-server.jar” to “java -jar selenium-server-standalone-2.0a5.jar”.

Then start the 2.0a5 server and run your tests. The HEAD/GET issue should be gone. In my case it was and I’m now back to extending my test suite finally making progress again.

My configuration: Visual Studio 2010, .NET 4.0, ASP.NET MVC 2, Vista Ultimate 32, various browsers (IE, Firefox, Chrome, Opera, Safari). The issue I describe here may be different than the one you observe. Consequentially it is possible that this suggested solution doesn’t work for you.

Wednesday, June 30, 2010

A “useful” help page for ModelStateDictionary.AddModelError()?

Just tried to use Microsoft’s online documentation for ModelStateDictionary.AddModelError(). The following picture is a screen shot as of 30 June 2010:

image

Yes, that’s all. This page could be generated by a piece of software (maybe it was?). There is no useful information in this beyond what I can derived from the method signature in the first place.

I wonder: What is the value of this page?

There was a time a few years ago when Microsoft MSDN documentation was orders of magnitudes better and even had some meaningful examples. Today, it appears that we are increasingly relying on the “community” to make up for the lack of sufficient document by the vendor. This is disappointing.

Disable Disk Defragmenter on Windows Vista

Ok, this is not a .NET topic at all. Still. This problem got increasingly annoying on my Vista laptop. Upon each reboot, and at least once a day even without reboot, disk defragmenter kicked in and analyzed the disk (“Analyzing disk”). Each time it would say this would take “a few minutes”. However, I always had more than enough time to go fetch a coffee.

Of course I found all the recommendations regarding switching off the schedule and also go to the scheduled tasks and disable the one or two defrag related tasks. I also found the hint that changing certain registry values would help. And still, upon each reboot and even without reboot at least once a day disk defragmenter couldn’t help itself to at least analyze the disks even if it wouldn’t do the defragmentation itself. If would do so even if it came to the conclusion about 15 minutes ago that the hard drives would need to be defragmented.

So, here is what I did to disable disk defragmenter from running:

  • I opened explorer and navigated to \windows\system32
  • I took ownership of “dfrgntfs.exe”
  • Then I added myself with full permissions to the file
  • Finally I renamed the file to “dfrgntfs.exe_”

And now it has finally stopped re-analyzing the disks. I understand that it is useful to do that occasionally. But every 15 minutes? How much data can I possible write to the hard disk that this interval is justified?

And if I ever feel like defragmenting my hard disk(s) I just rename it back to its original name and run it manually.

Saturday, June 26, 2010

Formatting Source Code for Blogger.com (and other blog sites)

When you search the net for a solution to formatting source code for your blog there won’t be a shortage of hits. I’ve tried quite a large number of them only to be disappointed.

The best option I’ve found so far is this syntax highlighting tutorial. It uses a hosted version of Alex Gorbatchev’s SyntaxHighlighter, which has gained a lot of popularity (e.g. ASP.NET forums).

Here is an example for how your source code looks like once you’ve set everything up:

using System.Net.Mail;

public class EmailHelper {
   private static void SendEmail(string from, string to, string subject, string body) {
      var message = new MailMessage(from, to, subject, body);
      using (var smtpClient = new SmtpClient()) {
         smtpClient.Send(message);
      }
   }
}

And your XML code would look as follows (note the error in the multi-line comment, at time of publishing this post):

<system.net>
   <mailSettings>
      <!-- Setting for release (need to update account settings): -->
      <!--<smtp deliveryMethod="Network">
         <network host="mail.mydomain.com" port="25" />
      </smtp>-->
      
      <!-- Setting for development (uses ssfd.codeplex.com): -->
      <smtp deliveryMethod="SpecifiedPickupDirectory">
         <specifiedPickupDirectory pickupDirectoryLocation="C:\data\Temp" />
      </smtp>
   </mailSettings>
</system.net>

image After some more searching I then found PreCode, yet another plug-in for Windows Live Writer (WLW). PreCode also supports SyntaxHighlighter.

When you use PreCode, it will also take care of the angle brackets as they need to be substituted so they are not interpreted as HTML.

Finally I seem to have found a solution that allows me to work seamlessly.

Here are the bits for this solution:

  • SyntaxHighlighter: See Alex Gorbetchev’s web site for more details, and check the syntax highlighting tutorial for how to set up your blog / web site.
  • PreCode: Download Precode from codeplex and install. Restart WLW.

The only thing missing – but I can live with that for the moment: The code is displayed in Edit and Preview mode in WLW but not highlighted. PreCode’s web site explains why.

How To Test Sending an Email in .NET?

Sending an email can be tested in many different ways. One option could be setting up an account with an online email provider (Yahoo, Hotmail, Google etc.) and then use that account for sending email.

To save time, however, it might be valuable to look at "SMTP Server for Developers” (SSFD on Codeplex). This simple tool – developed by Antix – gives you a local SMTP server which looks like a standard server from your application’s perspective but on the back side simply writes all emails to a folder. The emails are stored in a text file with the extension EML and with a predefined format (headers + empty line + body).

By using SSFD the round trip will be faster and for retrieving the email you simply read a file.

To configure email in .NET (I am using version 4.0) add the following to your web.config/app.config file (the highlighted line is needed so SmtpClient.Dispose() doesn’t throw an exception, see comments at the end of this post):

<configuration>
  <system.net>
    <mailSettings>
      <!-- Setting for release (need to update account settings): -->
      <!--<smtp deliveryMethod="Network">
            <network host="..." port="25" userName="..." password="..." />
         </smtp>-->
      <!--Setting for development (uses ssfd.codeplex.com):-->
      <smtp deliveryMethod="SpecifiedPickupDirectory">
        <network host="localhost" />
        <specifiedPickupDirectory pickupDirectoryLocation="C:\data\Temp" />
      </smtp>
    </mailSettings>
  </system.net>
</configuration>

Then in your code write the following:

using System;
using System.Net.Mail;
using System.Reflection;

namespace WebPortal.Controllers {
   internal class EmailHelper {
      public static void SendEmail(string from, string to, string subject, string body) {
         try {
            using(var smtpClient = new SmtpClient()) {
               smtpClient.Send(new MailMessage(from, to, subject, body));
            } 
            // SmtpClient.Dispose() may throw exception despite Microsoft's own guide.
            // See blog post for further details.
         }
         catch (Exception ex) {
            Log.Error(ex);
         }
      }

      private static readonly log4net.ILog Log =
         log4net.LogManager.GetLogger(MethodBase.GetCurrentMethod().DeclaringType);
   }
}

Of course this is only the simplest version. If you need to send to multiple recipients or want to use a specific encoding or HTML instead of text format then this code would needs a bit more meat. Furthermore in a production system you may want to add error handling that allows some feedback to the user or the system administrator.

One observation I made while working on this: Microsoft recommends that “a Dispose method should be callable multiple times without throwing an exception”. Unfortunately SmptClient.Dispose() throws an exception when no host has been specified, thus contradicting their own recommendation.

SSFD doesn’t require the hostname for operation but when you implement your client side code you may want to use “using(var smtpClient = new SmtpClient()) {…}” to ensure that all resources used by your code (e.g. server connections) are properly cleaned up. Without a hostname in the web.config file (or specified through some other means, e.g. programmatically) SmtpClient.Dispose() will throw an exception. Therefore even though SSFD doesn’t need it, add “<network host="localhost" />“ as shown in the above web.config example.

One More: R# Memory Consumption in VS 2010

In my last two posts I wrote about memory consumption of the VS 2010/Resharper 5 combo. In one of the posts I demonstrated how an average of about 10 MBytes of memory are lost each time you close and re-open a solution.

For this post I ran a different experiment. This time I just used R# in VS 2010 for a lengthy period of time without closing/re-opening the solution. The result is plotted in the following graph:

image

The horizontal axis is the commit to the source code repository that I did. I measured the memory usage after each commit. The vertical axis shows the usage of managed memory in MBytes.

As by and large R# is the only addin/extension that uses managed memory it still looks as if R# is “absorbing” this memory. It doesn’t seem look like memory fragmentation but rather like a memory leak. I didn’t run the experiment without R#. It wouldn’t be comparable as I wouldn’t have refactoring available to this degree.

Overall it seems as if version 5 of Resharper still hasn’t resolved the memory problems. Having said that for most project/solution types it should be fine, though.

Saturday, June 19, 2010

Update: ReSharper 5.0 Memory Consumption in Visual Studio 2010

After some discussions with a friend (thank you, Steve!) I have conducted further tests. This time I ran my little experiment with just Visual Studio 2010 and no add-in, extension or whatever installed. Just as it comes out of the box. To measure the memory consumption I used VMMap from SysInternals (owned by Microsoft).

VMMap also displays metrics for the Managed Heap. That’s the place where the objects are stored that are created when you instantiate objects using “new” within your C# code (other languages may use other keywords). Again I used the same solution as in my previous post on the subject, and I followed the same actions: Close Solution, Open Solution, Record current memory consumption.

This time I did 30 runs. First I did this for just VS 2010 without any add-in, extension, etc. Then I repeated the test but this time I had ReSharper installed. The memory I recorded was the “Committed Memory” as per VMMap. The results of my measurements is shown in the following graph:

image

For this test I used ReSharper 5.0.1659.36. Visual Studio 2010 was the latest and greatest according to Windows Update. VMMap was version 2.62. Be aware that for this test no other add-in, extension, etc. was loaded at any time. The only difference between the runs was that for the second run R# was installed while it wasn’t for the first run.

On a side note: You may wonder why closing and opening matters. Well, my preferred source control plug-in is AnkhSVN. And most of the time is does a great job. Except when it comes to service references. We version these as well but AnkhSVN doesn’t seem to pick up changes in these files reliably. Therefore when we need to update service references – which can happen a lot when we are implementing a new service library – then we use a different tool to commit the change set. Typically we use TortoiseSVN for that. And to make sure that all changes, including solution and project files, are properly saved and picked up, we close the solution file. After the commit we then re-open the solution and continue coding.

Your style of working is most certainly different so this scenario may not apply. For example, on days that I can fully spend on coding I typically commit 10 or more times a day.

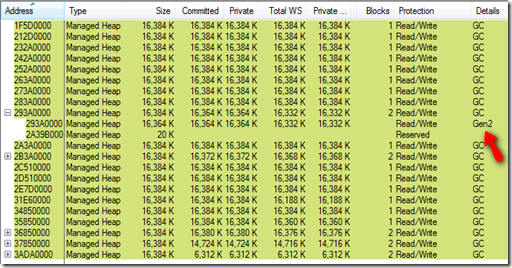
At the end of the second test run I then looked at the details for where the managed memory is consumed. It looks as if the memory that doesn’t get freed is listed under Garbage Collector (GC). It appears as if the GC cannot free up some big chunks of memory. This could be application domains that cannot be free because there is still a reference, or large caches or something like that. Here is the screenshot I took from VMMap at the end of the second test run:

2010-06-19_0037-ReSharper5-MemoryConsumption-VMMap What to make of all of this? If you have small solutions, plenty of memory (and there are tricks to tell Visual Studio to use more than 2 GB), don’t need/want to close the solution as often as I do, I’m sure that you will be unaffected by this. I haven’t checked yet how the memory consumption evolves over time under normal workload. I’ll monitor this as well and see whether there is more to discover.

Thursday, June 17, 2010

Visual Studio 2010, ReSharper 5 and Memory Consumption

The final word on memory consumption for R# is still not said. It looks as if the jury is till out. But judge for yourself.

I ran the following experiment: I created a solution in VS 2010 with 5 projects in total. Three of the projects are libraries and two of the projects are ASP.NET web applications, one to host services and the other to host the web user interface. All projects are C# and targeting .NET 4.

Then I open a new instance of Visual Studio 2010 and switched on ReSharper’s feature to display the consumption of managed memory in the status bar. The starting value was 19 MBytes after opening VS and no solution loaded. Solution-wide analysis is turned off. The entire system is a laptop with 4 GByte RAM and 32-bit Vista Ultimate. All software is maintained automatically to receive the latest updates and hotfixes.

Next I repeated the following steps 20 times:

  1. Open Solution
  2. Note managed memory usage
  3. Close Solution

Then I plotted the result in a graph. The x-axis is the number of the iteration while the y-axis is the memory consumption in MBytes as reported by the number in the status line, which is an option of ReSharper. I also put a linear trend line on top of the graph. You will note that except for the very first value we seem to have linear trend:

image

I’m not an expert but based on my experience this graph does not indicate that this is caused by memory fragmentation. If it was memory fragmentation I would expect the growth to decrease and eventually to flatten out. In this case we see a perfectly linear trend which makes me believe that someone is holding on to memory. And I know for sure it’s not me!

Each opening of a solution eats about 11 MBytes of memory. Closing the solution – I thought – should give free all memory that was used up because of the solution being open.

But maybe I’m completely off here and out of my depth. In that case I beg you: Please help me understand!

Tuesday, June 15, 2010

Visual Studio 2010 Professional Crashes

Feature-wise Microsoft’s new Visual Studio 2010 is definitely a big step forward. I spare you the details. In addition a large number of extensions are available for adding features (and featurettes) that you think you can’t live without.

There is a danger, however: I have downloaded a few of them and I’m now in the mode of disabling all them except the ones I really need, e.g. the Subversion source control addin.

Why? In the last few days I have experienced on average probably two crashes per day. In one case the only thing that helped was rebooting the computer (ok, maybe I shouldn’t use Vista …) So far – admittedly including a large number of extensions – Visual Studio 2010 is by far more shaky and crash-prone than Visual Studio 2008. I don’t know why but this is a slight disappointment.

I’ll update this post once I have disabled or even removed all the bells and whistles that I don’t need to survive as coder. Let’s hope disabling/removing those extensions will make a a difference.

Sunday, June 13, 2010

A Simple CAPTCHA Mechanism for ASP.NET MVC 2

Sometimes you may want to protect certain functionality from being used by automated tools. One way of preventing this from happening is using a CAPTCHA, which is basically an image that is intended to be impossible to read by software (e.g. OCR) but possible to read by humans. The Wikipedia article is a good starting point with regards to the limitations of a CAPTCHA and suggestions for how to address those limitations.

In this post I’d like to show to you how you could integrate a simple CAPTCHA mechanism for ASP.NET MVC 2 using C#. My objectives for this implementation were:

  1. Ideally all CAPTCHA related code is located in a single class.
  2. Using the CAPTCHA in a view should be a single tag.
  3. Avoid having to register HTTP handlers or any other modification of the web.config file

Having all of that in mind I experimented a while, tried out a number of suggestions that I found on the web and settled for now with the one I’ll describe in this post.

I’ll start with how the CAPTCHA can be used in a view (for MVC newbies: roughly speaking this is MVC-lingo for page or form). In essence the solution uses a controller class named CaptchaController implementing a method Show(). In your view you use it like this:

Next to it, you probably would want to display a text box for the user to enter their reading of the CAPTCHA value, so in the view the markup for that would look as follows:

This will create an image and next to it you would display a text box as follows:

image

Of course the value in the image would change.

Now that we can display the CAPTCHA and also have a text box for the user to enter the CAPTCHA value, the next challenge is to store the CAPTCHA value somewhere so that once the user has entered the value and it is coming back to the server, some server side code can validate the CAPTCHA value. The server side code for this looks like this:

This method returns a boolean that you can then use for further processing.

All the rest happens behind the scenes and is completely handled by the class CaptchaController. So what follows is a description of the implementation.

When the CaptchaController renders an image it also creates a cryptographic hash as a session variable. This hash is an MD5 value in my implementation and the calculation uses an additional value to add some ‘salt’ before calculating the MD5 hash. Since the client has no access to the server side code it won’t be able to calculate a matching pair of MD5 and CAPTCHA value. As ‘salt’ I use the assembly’s full name which changes with each compile as it includes the version number.

And here is the source code for CaptchaController:

As always: If you find any bugs in this source code please let me know. And if you can think of other improvements I’d be interested, too.

In closing I’d like to mention reCAPTCHA, for which an ASP.NET component is available as well. Google is the owner of reCAPTCHA and uses it to correct mistakes due to the limitations of OCR (Optical Character Recognition) in their book scanning activities. Depending on your requirements reCAPTCHA might be a good solution as well in particular if you are seeking better protection and/or want to support visually impaired users.

Maybe one day I’ll have the time to look for a single tag / single class integration of reCAPTCHA for ASP.NET MVC …

Saturday, February 27, 2010

ReSharper 4.5 Memory Consumption – Hopefully The Last Post On This Subject

I posted in the past about the memory consumption of ReSharper 4.5 with large solutions containing C# but also many C++ projects with over one million line of codes. We installed at least one newer patch in the meantime and it seems that the memory consumption issue caused by the combination of IntelliSense and ReSharper has disappeared in that once IntelliSense has built it’s cache, memory consumption goes back to normal.

In other words the guys at JetBrains seem to have found something, so this issue is solved for the time being. Some of my team members have switch ReSharper back on since.

But there is more admittedly smaller things. One of them is that updating the namespace for a class removes comments from the source code if those comments happen to be in the “wrong” location. Example: Create a WCF library. It will generate a service as an example in that project. Then set the default namespace in the project file to a different value. Go back to the service files (interface and implementation) and use ReSharper to move the interface and the service to the new updated namespace. One comment will disappear in each file. The generated comment is not a big deal. But it could also be a comment that you wanted to keep, let’s say a URL with important background details of your implementation. This behavior is reproducible with version 4.5 and Visual Studio 2008. I haven’t checked the beta for version 5.0, though. Chances are that this has been fixed as well.

Don’t get me wrong: ReSharper is a tool that helps improving the productivity and quality of your code significantly. Despite a few nuisances in the product I use ReSharper on a daily basis. Whether you use this tool or a different one, there is no excuse for not refactoring your code mercilessly!

Tuesday, February 23, 2010

Generic Empty Array

In certain situations empty arrays of a specific type can be handy. Of course you could always use “new MyType[0]” to instantiate such an empty array and in most situations this will be just fine.

However, if this happens often – like hundreds and thousands of times – then you may want to consider the implementation of a generic empty array. Although it consumes only a few bytes per instance it still contributes to memory consumption and fragmentation and the garbage collector has a few more things to do as well. With a generic empty array a single instance per type is shared throughout your code and those –generally small problems – are avoided in the first place.

Of course this idea is not new. For example check out this conversation on stackoverflow. However the code given there contains a small glitch and doesn’t compile, so here is the source code for the same thing with that glitch resolved:

   25 namespace csUnit.Common {

   26    public static class EmptyArray<T> {

   27       private static readonly T[] Empty = new T[0];

   28       public static T[] Instance {

   29          get { return Empty; }

   30       }

   31    }

   32 }

But wait, there is one more: When you use an array as a return value for a method you may also want to consider reading Eric Lippert’s thoughts on the subject. It definitely doesn’t hurt and may make your code more efficient and improve the design of it.

Friday, February 19, 2010

Whereabouts of csUnit

Ok, I’ve been a bit quiet on csUnit for a while. The reason being that I tried to get a plug-in for ReSharper running. And to some degree I got it to where the most simplest cases would work. At the moment I’m kind of stuck. I tried to figure out how to make it execute SetUp, FixtureSetUp, etc. methods but wasn’t successful so far. I tried to find some online documentation, got the sources for about half a dozen other plug-ins, and still. Maybe I’m just overlooking something very obvious.

So any of you, dear readers, if any of you can point me to more information or if anyone would like to help out, please get into contact at manfredmlange at gmail dot com. Thank you!

Of course I’ll continue searching for a solution in the meanwhile but I cannot make any promises.

Tuesday, February 16, 2010

Consuming a WCF Service

In one of my recent posts I demonstrated how to implement a simple WCF service using Visual Studio 2008. This time I’ll look at how to implement the client. In doing so I’ll highlight an important oversight of quite a few examples on the internet include at least one provided my Microsoft (see references)!

I’ll continue where I left the solution last time:

image

I’ll add a service client next. Many different options are possible, a Forms-base native application, a WPF-based client, an ASP.NET site, command line, and many more. For this example I’ll use an ASP.NET front-end.

Creating the ASP.NET Application

I’ll use add a new project to the solution. Here is the recipe:

  1. Select from the solution context menu “Add”, then “New Project…”
  2. In the tree on the left expand the “Visual C#” node, then click “Web”
  3. On the right select “ASP.NET Web Application”
  4. As a name enter “DuckWeb”.

Here is how it should look like just before you click “OK”:

image Click OK and your solution should now look like this (I collapsed the DuckServiceLibrary to save some space):

imageOpen the file Default.aspx in source mode and add a label, a text box and a button as follows:

    1 <%@ Page Language="C#" AutoEventWireup="true"

    2     CodeBehind="Default.aspx.cs" Inherits="DuckWeb._Default" %>

    3 <!DOCTYPE html PUBLIC "-//W3C//DTD XHTML 1.0 Transitional//EN"

    4          "http://www.w3.org/TR/xhtml1/DTD/xhtml1-transitional.dtd">

    5 <html xmlns="http://www.w3.org/1999/xhtml" >

    6 <head runat="server">

    7     <title></title>

    8 </head>

    9 <body>

   10     <form id="form1" runat="server">

   11     <div>

   12     <asp:Label ID="_pondNameLabel" runat="server" Text="Pond Name:">

   13     </asp:Label>

   14     <asp:TextBox ID="_pondNameTextBox" runat="server"></asp:TextBox>

   15     <asp:Button ID="_submitButton" runat="server" Text="Submit"

   16           onclick="_submitButton_Click" />

   17        <br />

   18        <br />

   19        <asp:Label ID="_pondStatusMessage" runat="server" Text="Status unknown.">

   20        </asp:Label>

   21     </div>

   22     </form>

   23 </body>

   24 </html>

When you view this in a browser it looks like this:
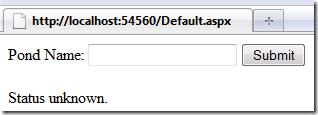
image

It doesn’t do anything yet, however. Next I’ll add an event handler to clicking the button. In the Design view of Visual Studio for Default.aspx I simply double-click the button which gives me the following handler:

   14 protected void _submitButton_Click(object sender, EventArgs e) {

   15 

   16 }

In this I’ll add the the code for the service. However, in order to consume the service the web application needs a reference to it. That’s easy to do by doing a right mouse click in the solution explorer on the project “DuckWeb” and then selecting “Add Service Reference…”:

imageIn the “Add Service Reference” dialog I click the “Discover” button and then enter as namespace at the bottom “PondServiceReference”:
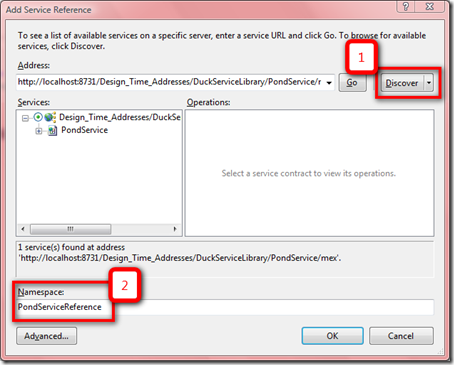
image

Upon clicking “OK” the service reference will be added and I can start using the service as if it was just another .NET library.
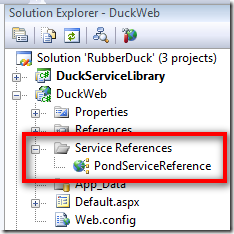
image Let’s return to the _submitButton_Click() event handler. Since I now have the service reference available I can write my first implementation:

    1 using System;

    2 using System.Web.UI;

    3 

    4 using DuckWeb.PondServiceReference;

    5 

    6 namespace DuckWeb {

    7    public partial class _Default : Page {

    8       protected void Page_Load(object sender, EventArgs e) {

    9 

   10       }

   11 

   12       protected void _submitButton_Click(object sender, EventArgs e) {

   13          var client = new PondServiceClient();

   14 

   15          _pondStatusMessage.Text = _pondNameTextBox.Text +

   16             (client.IsFrozen(_pondNameTextBox.Text) ?

   17                                     " is frozen." : " free of ice.");

   18       }

   19    }

   20 }

Note that I added a using statement for the namespace that contains the generated classes for the service reference. Please also note that this code is far from production ready but I’ll come back to this shortly. First let’s see whether this already works as expected. After setting the DuckWeb project as the startup project the browser is launched and I give it a test run:
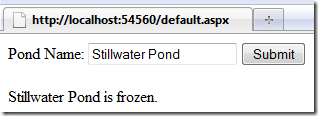
image Just what I wanted! So all good, right? Not quite! Return to the code where I create the PondServiceClient instance:

   13 var client = new PondServiceClient();

In this line I also create a connection to the service. However, nowhere in the remainder of the code do I close this connection. Of course at some point the instance will be subject to garbage collection and of course the connection will eventually be closed. However, if I rely on this mechanism I have very little control over when that happens. In this simple example it may not be a big issue. However, if the service implementation uses other resources per connection, e.g. a database connection, or if the service is configured to service only a certain number of open connections, e.g. 10, then your system will get into trouble very quickly. Unfortunately some examples on MSDN or similar sites don’t close WCF connections either (see references below), so chances are that we’ll see service clients that won’t be implemented correctly.

Therefore let’s add a line that closes the connection:

   13 protected void _submitButton_Click(object sender, EventArgs e) {

   14    var client = new PondServiceClient();

   15 

   16    _pondStatusMessage.Text = _pondNameTextBox.Text +

   17                              (client.IsFrozen(_pondNameTextBox.Text)

   18                                  ?

   19                                     " is frozen."

   20                                  : " free of ice.");

   21    client.Close();

   22 }

Now this looks already better. But it is still not good enough!

What if we cannot connect to the service for whatever reason? If that is the case the generated code will throw different types of exceptions depending on the error. The recommended way (or canonical way if you like) of handling the exception looks as follows:

   23 protected void _submitButton_Click(object sender, EventArgs e) {

   24    var client = new PondServiceClient();

   25 

   26    try {

   27       _pondStatusMessage.Text = _pondNameTextBox.Text +

   28                                 (client.IsFrozen(_pondNameTextBox.Text)

   29                                     ?

   30                                        " is frozen."

   31                                     : " free of ice.");

   32       client.Close();

   33    }

   34    catch (CommunicationException ex) {

   35       // Handle exception

   36       client.Abort();

   37    }

   38    catch (TimeoutException ex) {

   39       // Handle exception

   40       client.Abort();

   41    }

   42    catch (Exception ex) {

   43       // Handle exception

   44       client.Abort();

   45    }

   46 }

In all exception handlers I call client.Abort() to cancel the connection. In a real application I would also present a message to a user along the lines “Cannot answer your request as a required service is temporarily not available. Please try again later.”

How about using a using(var client = new PondServiceClient()) contruct:

   49 protected void _submitButton_Click(object sender, EventArgs e) {

   50    using(var client = new PondServiceClient()) {

   51       _pondStatusMessage.Text = _pondNameTextBox.Text +

   52                                 (client.IsFrozen(_pondNameTextBox.Text)

   53                                     ?

   54                                        " is frozen."

   55                                     : " free of ice.");

   56    } // Dispose will be called here.

   57 }

Dispose will be called at the end of the using-block. However, this code doesn’t handle the exceptions yet that you might encounter in the invocation of the service. Furthermore, an exception can also happen when Close() is called from Dispose(). How would you handle those exceptions? The using-construct would lead to very ugly code. For a more detailed discussion see the references at the end of this blog.

This concludes this step of the blog post series on WCF services. There will be at least one more on how to propagate error conditions from a service to a consumer.

Update 09 April 2012: In a newer blog post I’m discussing various options for simplifying the client side. The discussion includes ways for handling everything according to Microsoft’s recommendations while at the same time avoiding code duplication.

References

Some examples for WCF client code that doesn’t close the connection to the service:

It is correctly mentioned and demonstrated at:

Friday, February 12, 2010

Installing SQL Server 2008 (64bit) on Windows 7 (64bit)

As described here you can run into an error when trying to install Microsoft SQL Server 2008 (x86, 64bit) on a Vista (64bit). The error message is something along the line "The INSTANCESHAREDWOWDIR command line value was not specified. This value must be specified when the INSTANCESHAREDDIR value is specified."

You can run into the same issue on a Windows 7 (64bit) as well as I had to learn today. I used the default installers for SQL Server 2008 Developer Edition, 64 bit.

One additional note, though: If you have accidentally changed the default installation path to something that works for you and then back to the default, the error might not go away. In that case cancel the installation and start all over. This time, don't touch the default installation path.

This approach worked in my case. Of course, if you prefer the software to be installed in a different location or drive, you may have to try the workaround described here.

Thursday, February 11, 2010

Microsoft Visual Studio 2010 RC Released

Microsoft just made available the release candidate (RC) for Visual Studio 2010 and the .NET Framework 4.0. The downloads are available for non-MSDN subscribers as well. The RC does not support Silverlight 4 development. If this applies to you stay on beta 2.

Thursday, February 04, 2010

Using Environment Variables in WiX

Today I ran across a challenge with WiX, which took me a couple of hours to resolve. Maybe I can help you saving this time by describing what I tried to achieve and how I resolved it in WiX.
Although our build machine uses a 32 bit operating system in some cases we build certain solutions on a 64 bit OS. One of these solutions includes a WiX project which packages a merge module for the C runtime libraries. On the 32 bit platform merge modules are located in “c:\Program Files\Common\Merge Modules”. In our WiX installer script (a WSX file) we package a merge module with a hardcoded path. This works fine on a 32 bit operating system.
However, it fails on a 64 bit operating system. There Visual Studio 2008 places the merge modules in “c:\Program Files (x86)\Common\Merge Modules”. As a consequence the hard code path doesn’t work.
I’d like to do set this path differently based on an environment variable. I chose “CommonProgramFiles(x86)” which exists on the 64 bit platform but is undefined on a 32 bit OS. Based on information I found at WiX’s web site, my first attempt looked as follows:
    3 <?ifdef $(env.CommonProgramFiles(x86)) ?>
    4 <!-- Variable is defined, we are building on 64 bit -->
    5 <?define commonProgramFiles = "c:\Program Files (x86)\Common\" ?>
    6 <?else?>
    7 <!-- Variable is not defined, we are building on 32 bit -->
    8 <?define commonProgramFiles = "c:\Program Files\Common\" ?>
    9 <?endif?>
Note, that this is not about the computer on which I want to install the software package. This is about the computer on which the installer is created. So the idea is that I would then be able to use the variable ‘commonProgramFiles’ later in the script, e.g. when referencing a file:
    1 <File Source="$(var.commonProgramFiles)Merge Modules\Microsoft_VC90_CRT_x86.msm" >
    2    ...
    3 </File>
Trouble was that it wouldn’t work. With some further digging I found a message in an email list that contained the helpful hint. The relevant quote is:
“Use <?ifdef?> first to see if it's defined. Don't use $() around it in an <?ifdef?>.”
So I rewrote the the WiX script as follows:
    3 <?ifdef env.CommonProgramFiles(x86) ?>
    4 <!-- Variable is defined, we are building on 64 bit -->
    5 <?define commonProgramFiles = "c:\Program Files (x86)\Common\" ?>
    6 <?else?>
    7 <!-- Variable is not defined, we are building on 32 bit -->
    8 <?define commonProgramFiles = "c:\Program Files\Common\" ?>
    9 <?endif?>
Note how line 3 has changed. Now it worked like a breeze! I can now build the installer on both a 32 bit OS and a 64 bit OS and the project will still find the required merge module.
One further note: If you want use any of the WiX tools in a batch file, you may want to use %WIX% instead of a hard coded path to the toolset.
Jason, thank you very much for your help in sorting this out!
P.S. I haven’t forgotten about the mini-series of blogs about WCF-based services I’ve started a few days ago. It’s still coming!