Wednesday, February 03, 2010

ArgumentException vs ArgumentNullException

Ok, maybe I’m missing the point, but here is an item I don’t understand: When you want to throw an ArgumentException with the parameter name and a message as arguments, then the parameter name is the first parameter. When you use ArgumentNullException it’s just the other way round. Sounds complicated? It becomes more apparent once we look at some source code:

    1 public void DoSomething(string paramName) {

    2    if (paramName == null) {

    3       throw new ArgumentNullException(

    4          "paramName", // Must be first parameter here

    5          "Parameter cannot be null."

    6       );

    7    }

    8    if (paramName.Length < 10) {

    9       throw new ArgumentException(

   10          "String must have at least 10 characters.",

   11          "paramName"  // Must be second parameter here

   12       );

   13    }

   14    // ... rest of the method ...

   15 }

I haven’t noticed this in the past but nevertheless: Unless I’m totally overlooking the brilliant idea behind this, I’m not quite sure whether this inconsistency makes using these classes easier…

It’s certainly not a big issue and it’s probably too late anyways to fix this particular problem. I still wanted to rant a bit… and I’ll take this as an opportunity to search for similar inconsistencies in my own code.


I just noticed: This is my 100th post on this blog! Time to celebrate. Cheers!

Tuesday, February 02, 2010

Implementing a WCF Service in Visual Studio 2008

I’m aware that there are quite a few examples already for how to implement and consume services using WCF in Visual Studio 2008. However, I’d like to provide a slightly different example by providing some additional aspects that you may want to consider for commercial deployments. This includes propagating error conditions and system design aspects, all using the same running example. At times this will certainly stretch the blog format somehow and I may provide a more detailed documentation in a different format.

Enough talk. Let’s get something done!

WCF (Windows Communication Foundation) is a very powerful part of the Microsoft .NET framework. In this post I will show you how to implement a very simple service. And as a running example I’ll use ducks. So the service will be called PondService where ducks can feed. As a tool I’ll use Visual Studio 2008 augmented with ReSharper and AnkhSVN. ReSharper (commercial) is a very powerful tool for refactoring (has some limitation in certain scenarios, e.g. memory consumption) while AnkhSVN (free, open-source) is an extremely helpful plug-in and client for Subversion.

Creating The Solution

As a first step I need an empty solution, which I’ll call RubberDuck. Here’s the recipe:

  1. From the menu select “File” - “New” - “Project…”
  2. In the tree on the left expand “Other Project Types”
  3. Select “Visual Studio Solutions”, then on the right “Blank Solution”
  4. Enter “RubberDuck”

Here is what it should look like:

image

Click “OK”.

Add the Service Library

Next, I’ll add a service library to the solution. We’ll call it DuckServiceLibrary. Here’s the recipe:

  1. In the “Add New Project” dialog in the tree on the left select “Visual C#” then “WCF”.
  2. Then select “WCF Service Library” on the right.
  3. As a name enter “DuckServiceLibrary”.

At this stage the dialog should look as follows:

image

After I click OK the solution looks as follows:

image

Next we’ll add the PondService to the new service library. For this step you need to be aware that there are (at least) two items that look as if they are a fit: “Windows Service” and “WCF Service”. The former would be an old-style web service which technically would work. However, we choose “WCF Service” in the “Add New Item” dialog box. Here is how the dialog looks before I click “Add”:

image

The solution still contains IService1.cs and Service1.cs which were generated when I added the service library. I simply delete them. However, there is more cleanup work required. The DuckServiceLibrary contains a file named “app.config”. Of course I could go in and just delete the entries for Service1. However, there is a second option: The Microsoft Service Configuration Editor. You can launch it from the context menu on “app.config”:

image

There are two places in the Service Configuration Editor (SCE) where I’ll remove the configuration entries for Service1. First there is the Service1 and there is the Service1Behavior:

image Delete the two highlighted nodes. Then make sure you client “Save” before exiting. While I’m comfortable to edit XML files I prefer the SCE since it is harder to accidentally delete items you still need.

The Actual Service Implementation

With all of this in place (just takes a couple of minutes, once you get used to it), I’m now in a position to define the interface I’d like the service to have. To stay with the running example the duck would like to know whether a particular pond is currently frozen or not. During winter a frozen pond doesn’t really help finding food. After removing all unused using’s (ReSharper function) the service interface looks as follows:

    1 using System.ServiceModel;

    2 

    3 namespace DuckServiceLibrary {

    4    [ServiceContract]

    5    public interface IPondService {

    6       [OperationContract]

    7       bool IsFrozen(string pondName);

    8    }

    9 }

The implementation is even simpler. Using the “fake it ‘till you make it” I simply return true. Of course real ducks wouldn’t like that service level so you probably want to offer something more substantial!

    1 namespace DuckServiceLibrary {

    2    public class PondService : IPondService {

    3       #region Implementation of IPondService

    4 

    5       public bool IsFrozen(string pondName) {

    6          return true;

    7       }

    8 

    9       #endregion

   10    }

   11 }

By convention I’ve surrounded the service implementation with a region. In this example it doesn’t make a big difference but once a class becomes larger then it pays off to use a region per interface implementation.

Trying Out the Service

Although I haven’t implemented a client I can still try out what I have so far. Hit F5 and Visual Studio will compile the service library and launch a WcfServiceHost that host the service. It will also launch a WCF Test Client with the PondService added to it already:

image To try the service out I double click on the “IsFrozen()” operation. The WCF Test Client will open a tab in the right hand pane into which I can enter a pond name as follows:

image Next I click the Invoke button and I get the response from the service. I can verify the response in the lower right part of the WCF Test Client window:
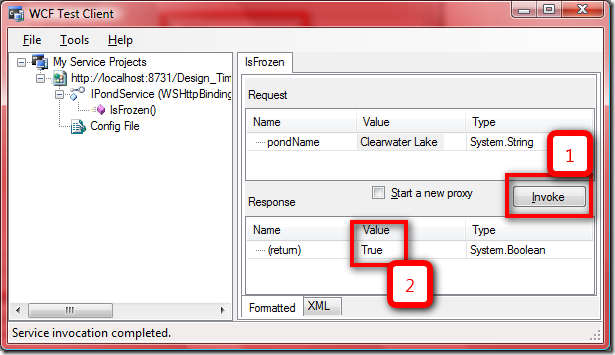
image By the looks of it we didn’t make a mistake with our implementation: The Clearwater Lake is frozen.

So this is it for this post. In subsequent posts I’ll cover:

  • How to implement a WCF client?
  • How to exchange data between server and client?
  • How to propagate error conditions?
  • Others

Stay tuned!

Wednesday, January 13, 2010

ASP.NET Web Deployment Projects and Subversion

If you are using both ASP.NET Web Deployment Projects and Subversion you might have come across the issue that the deployment project copies entire folders including the hidden Subversion folders called '.svn'.

To prevent files from being included in the deployment you can modify the project file by modifying the ItemGroup element. Here is an example that excludes '.svn' as well as the C# project file and the intermediate files in 'obj':

<ItemGroup>
   <ExcludeFromBuild Include="$(SourceWebPhysicalPath)\**\.svn\**\*.*" />
   <ExcludeFromBuild Include="$(SourceWebPhysicalPath)\*.csproj.*" />
   <ExcludeFromBuild Include="$(SourceWebPhysicalPath)\obj\**\*.*" />
   <!-- further exclude items here -->
</ItemGroup>

Saturday, January 02, 2010

Compile error in file reference.cs

It's a bit strange but I'm observing the following: ASP.NET Web Application + Service Reference + master page = compile errors in file reference.cs Under certain circumstances the above combination doesn't seem to work in Visual Studio 2008 SP 1. If that is the case you may see compile errors like "The type name 'xxx' does not exist in the type 'yyy' ... Reference.cs ..." For example: To better understand what is going wrong let me also show the project settings: And here is the project layout:The point is that I added a master page named "Dolphin.Master". It has the prefix "Dolphin." which is also the default namespace set for the project. The default namespace in the project settings is used to generate client side code for the service reference. So if you receive a compile error, my recommendation would be to rename the master page to something different than the project's default namespace. When you do, please be aware of the following items as they may lead to follow-on issues:
  1. References to the master page will not be updated in the content pages. You will need to update them manually, e.g. using find-replace.
  2. The same applies for the rename refactoring in ReSharper (version 4.5.1288).
This post applies to Visual Studio 2008 SP1. The system had the latest patch level as of writing. I did not assess whether this issue still exists in Visual Studio 2010 as it hasn't been released yet as a production version. I'd be interested, though, if you find variations of this problem, or if you find different options for resolving it.

Saturday, November 14, 2009

C# 4.0: MethodBag, ExpandoObject and other cool stuff

With the new features that are part of the DLR you can create plenty of cool stuff like Dynamic Method Bags, ExpandoObject, etc. More blogs, tutorials and articles will follow. And without doubt these new features have their place and will provide excellent value in those cases. However, always keep this in mind: "To a kid who gets a hammer for Christmas, everything looks like a nail." In economically challenging times you can prove your value even more by choosing carefully where, when and how you use new technology. Rumors has it that occasionally not using the newest features is the better choice ...

Monday, November 09, 2009

IE8 and Selenium RC: Tests won't execute

Just noticed that running tests through Selenium RC in Internet Explorer 8 (IE8) displays a message containing an info to disable pop-up blocker. IE reports a script error and also says that it cannot load "...htmlutils.js". The solution was simple: Run the Selenium RC server in admin mode. Launch the command line as administrator then start selenium RC using "java -jar selenium-server.jar". The scripts should then run. (Of course you would put all of this into a short script or batch file, which in turn is set to run "As Administrator". I observed this behavior on Windows Vista Ultimate 32 bit with IE8 and all of that updated to the latest patch level. The Selenium version was 1.0.1. The behavior might also be present in other combinations. Also the solution described above may or may not help on other tech stacks.

Sunday, November 08, 2009

ASP.NET Forms Based Authentication: Minimum Configuration

Where possible I try to implement functionality with the minimum code I can get away with. Yes, that means that I leave out all 'flexibilities' that are not needed right away even those that others would see as we will need them anyway tomorrow. Sometimes tomorrow never comes. Anyways. ASP.NET offers several options for authentication. For one application I chose forms based authentication. The minimum working configuration that I found looks as follows:
<authentication mode="Forms">
</authentication>
<authorization>
  <deny users="?"/>
</authorization>
Place this in your web.config file inside the system.web element. Of course it is likely that for production scenarios you will use something more sophisticated. However, for development purposes sometimes all you want is the minimum to get you started. And that's all the above is about.

Monday, November 02, 2009

ASP.NET, Master Pages and Selenium RC

Testing master pages in ASP.NET using Selenium can be tricky at the beginning since ASP.NET mangles the identifiers of controls on your pages. For example: You might have a form with an input text box. You give that text box the id 'myTextBox'. Then your Selenium RC test might look as follows:
[Test]
public void MyTextBox() {
   _selenium.Open("http://localhost:49583/");
   _selenium.Type("myTextBox", "some content");
   // ... rest of the test
}
The problem with this is that the test will fail even if you have given your textbox the correct id. The reason for that is that ASP.NET mangles the identifier to something like "ctl00_..._myTextBox". You can't be sure how it is mangled next time when you compile the page or next time ASP.NET is update. The better approach is one that works regardless how the id is mangled so long as the original id is still included. So here we go:
[Test]
public void MyTextBox() {
   _selenium.Open("http://localhost:49583/");
   _selenium.Type("//input[contains(@name, 'myTextBox')]", "some content");
   // ... rest of the test
}
Now of course you may need to locate an element more often so it makes sense to write a little method for this. With that method the test then becomes:
using csUnit;
using Selenium;

namespace MyWebSite.Web.Tests {
   [TestFixture]
   public class WebSiteTests {
      private string XPathForInput(string identifier) {
         return string.Format("//input[contains(@name, '{0}')]", identifier);
      }

      [Test]
      public void MyTextBox() {
         _selenium.Open("http://localhost:49583/");
         _selenium.Type(XPathForInput("myTextBox"), "some content");
         // ... rest of the test
      }

      // ... rest of the fixture

      private ISelenium _selenium;
   }
}
Although I found a few examples on the internet I thought that provide some concrete code might help you to get up to speed faster.

Sunday, November 01, 2009

WiX vs InstallShield

Until recently we used InstallShield for all our software packaging needs. It was never a love relationship as the product is complicated to use and we don't need the vast majority of its features anyways despite the fact we are deploying large enterprise systems consisting of multiple installers. Not long ago we ran into problems with InstallShield and tried to get to support. Understandably support is not available for free, so I sent an email to their sales department ("sales@...") "threatening" to even spend money on purchasing a support contract. I never received a reply. Since the issues we observed with the product didn't disappear and the information available on the internet, e.g. forums, didn't help either we look for alternatives. The packaging had been a long standing concern. So we looked again at WiX (Windows Installer Toolkit). It took one of my engineers not more than one month to rewrite all installers using WiX, and our next monthly release in November will be shipped entirely on WiX. Is WiX perfect? No, not at all. But we now have a tool that is much simpler to use and it fits very nicely with our other Visual Studio based tools. In addition: WiX is open-source and we don't have a licensing issue which is kind of nice as now not only all team members can use it at the same time but we can also always run our automated processes without even thinking about licensing issues. So overall I'm glad we took a fresh look at WiX and that we phased out InstallShield. Given the available service levels, the associated cost, and in particular the fact I never heard back from their sales department although I was willing to spend money, WiX is the better choice for us overall. And maybe it's also the better choice for your project?

Saturday, October 31, 2009

Web user interface testing? Selenium!

Working on a web based user interface? New or existing? Need automated testing? No problem: Use Selenium. Yes, it's Java-based but that's no reason for not using it. It also works for web development based on .NET. Selenium is nothing new for most .NET base developers. Still it might be worthwhile to have a brief look at how to integrate it with your solution. So here are the basic steps to make it work. First, of course, you need to download Selenium from here. The version that you most likely want to use is Selenium RC. Once downloaded, installation is very simple:
  1. Create a folder for Selenium. I typically use c:\bin\selenium (I hate typing double quotes and stuff for command lines if folder names contain spaces)
  2. From the archive extract 'Selenium-Server-...' and 'Selenium-dotnet-client-driver-...' into the folder you create in step 1.
  3. Open a command prompt in the 'Selenium-Server-...' folder.
  4. Execute the command 'java -jar selenium-server.jar'
That's it. Your selenium server is now running and waiting for your tests to be executed. Next you'll need to write some tests using your favorite unit testing tool, e.g. csUnit. You'll need to add Selenium's client driver assemblies to your test project. The one you'll need is called 'ThoughtWorks.Selenium.Core.dll' which you can find in the 'Selenium-dotnet-client-driver-...' folder you created earlier. Once adding the required reference writing the test is pretty simple. You can find some examples to start with here.

Saturday, September 05, 2009

Path used in Assembly.LoadFrom()

One way of loading an assembly into an AppDomain is using the static method Assembly.LoadFrom(). An interesting aspect here is: Which folder is used when you supply a relative path? You might be seduced to believing that it will use AppDomain.CurrentDomain.BaseDirectory and combine that with the relative path. That's, however, not correct. Instead it is using Environment.CurrentDirectory, which can be an entirely different directory than the AppDomain's base directory! The online documentation states that it is using "the current directory" but this might still be misleading as it doesn't necessarily make the reader aware that this is different from AppDomain.CurrentDomain.BaseDirectory. Therefore, if you want to be on the safe side construct an absolute path, e.g. by using Path.Combine() etc. Also consider that the location from where you (down)load might actually be an URL.

Sunday, August 30, 2009

AssemblyFileVersionAttribute and AssemblyVersionAttribute: A subtle difference

In Visual Studio 2008 (and possibly other versions) when you create a C# project in many cases the wizard also creates the AssemblyInfo.cs file for you. That's quite handy but it can also come with a surprise caused by a subtle difference. Usually both the AssemblyFileVersionAttribute and the AssemblyVersionAttribute are created for you. The generated code looks as follows:
// Version information for an assembly consists of the following four values:
//
//      Major Version
//      Minor Version 
//      Build Number
//      Revision
//
// You can specify all the values or you can default the Build and Revision Numbers 
// by using the '*' as shown below:
// [assembly: AssemblyVersion("1.0.*")]
[assembly: AssemblyVersion("1.0.0.0")]
[assembly: AssemblyFileVersion("1.0.0.0")]
The issue that you may run in is that when you read the comment and infer that it applies to both AssemblyVersion and AssemblyFileVersion. That is not the case! AssemblyVersion can deal with wild cards as the generated comment suggests. For AssemblyFileVersion "wild cards are not supported". There is a solution however. If you simply remove the AssemblyFileVersion, the version will be picked up from AssemblyVersion. as the Win 32 file version. And for AssemblyVersion you can use wild cards. In that case your code in AssemblyInfo.cs would look like this:
[assembly: AssemblyVersion("1.0.*")]
// No wild cards for AssemblyFileVersion!
//[assembly: AssemblyFileVersion("1.0.0.0")]
// Since AssemblyFileVersion is commented out AssemblyVersion
// will be used for Win 32 file version.
So the recommendation is: Comment out AssemblyFileVersion unless you can't get away without it.

Thursday, August 20, 2009

ReSharper 4.5 Plugin for csUnit

Since I'm using csUnit and ReSharper in combination I certainly would like to have a better integration here. While JetBrains provides as part of their PowerToys the source code for a csUnit plugin, it unfortunately lacks a few things, e.g. the latest PowerToys set of files seems to be incomplete. For example the readme file refers to folders and files that are not included. Also, the sources for the csUnit plugin that are included in PowerToys create a number of compile errors when compiled against ReSharper 4.5. Apparently the examples weren't updated from previous versions, and R# 4.5 has a few breaking changes.
So I decided to update the example code and also add it to the csUnit source code. Here are two screen shots. The first one shows the editor with R#'s adornments on the left The second screenshot shows a window of R# displaying the result of a test run: The ReSharper plugin for csUnit is planned to be included in csUnit 2.7, which we plan to release in a few months. We haven't decided yet on the final date.

Sunday, August 16, 2009

Calling Process.Modules reliably

Namespace System.Diagnostics contains the class Process. With this class you can determine how many modules your process has loaded, even across multiple domains. There is a catch, however, since accessing the property Process.Modules may throw a Win32Exception. This property may be empty in which case Microsoft's documentation recommends to use WaitForInputIdle() to before retrieving the property. Before you access it you don't know, and if you do and it is empty at that point you'll get the Win32Exception. You can also call Process.WaitForInputIdle() just before you access Process.Modules, just to be on the safe side. However, using WaitForInputIdle() may throw an exception as well in certain circumstances. I couldn't find this exception mentioned in the documentation for WaitForInputIdle(), though. Therefore I decided to create a little helper method to make retrieving Process.Modules more reliable. Here is my code:
private static int GetModuleCount() {
  var currentProcess = Process.GetCurrentProcess();
  try {
     return currentProcess.Modules.Count;
  }
  catch(Win32Exception) {
     // Wait until input message is empty and retry.
     currentProcess.WaitForInputIdle();
     return currentProcess.Modules.Count;
  }
}
The first attempt assumes that the message loop is empty and the process in idle. If that call fails the code assumes that indeed more messages need to be processed so it waits until no further input needs to be processed. Then it simply tries again. If you need this method in several places in your code then you may also want to consider to create it as an extension method for class Process. I didn't implement the above code as an extension method since I needed it only in once place (hence it is a private method).

Friday, August 14, 2009

Some Tips for TeamCity

We are using TeamCity for continuous integration. Here I'll give provide a few tips in particular for people who are less familiar with Java. (After all this is a .NET blog!) Starting with the free Professional Edition we quickly decided to go for the Enterprise Edition to get unlimited build configurations and LDAP integration. Migrating from the built-in HSQL to a separate database server and integrating to LDAP wasn't overly complicated, although it certainly helps if you have access to JetBrain's support. So here are my tips for TeamCity:
  1. Use a separate database server from the beginning. That way you save the database migration.
  2. When you migrate the database you execute a piece of Java code. You may have to specify a parameters for the JVM. Since the first attempts failed I had to tell the tool to clean out the target database first. To do this in the file migrateDB.bat locate the line that starts with "SET MIGRATION_JVM_OPTS". Add "-DforceClean=true" to the options. This will drop all tables in the target database. (You don't want to do that once you have migrated, so best is to remove this immediately after a successful migration!)
  3. In some cases the migration will fail and the error messages may not necessarily be a big help unless you have done migrations plenty of times. In my case I had a path to the old server configuration wrong. So check that as well.
  4. If the migration fails then check the log files. They provide good information.
  5. When specifying paths anywhere use forward slash instead of backslash, even on Microsoft platforms.
Now our deployment is on a separate database and it actually improved the performance. Moving to LDAP avoids quite a bit of administrative work. All runs smoothly. Thanks to to Serge, Leonid, and Yegor of JetBrains for their fantastic support!

Sunday, August 09, 2009

Windows API Code Pack for .NET

Trying to stay on top of the latest UI developments of Windows was never easy not only from a technical perspective. At times it also appeared as if Microsoft tried to make sure that new controls made their way into Microsoft Office first just so their applications were the only ones with the most recent user experience. On the other hand things seem to change. Microsoft makes newer user experience elements available sooner. Maybe the reason is that drumming up support for a newer operating system like Windows 7 is faster. Be it as it is. On August 06, 2009, Microsoft published an updated version of the Windows API Code Pack that gives you quite a few new elements you can leverage for your applications. For example you can programmatically control the appearance of the taskbar for your application by providing jump lists and reporting back progress. Get the Windows API Code Pack for .NET here. There also a few links to videos that show how to use some of the features. While some of the items work for Windows 7 only, some of them will work on older Windows versions as well.

Saturday, July 25, 2009

Problem using fuslogvw.exe

In case you try to use the Fusion Log Viewer (fuslogvw.exe) and you can't change the Log Settings because they are all disabled then simply run the application as an administrator. To make things really easy just create a shortcut to fuslogvw.exe and modify the shortcut properties (right mouse click). In the "Compatibility" tab tick the box for "Run this program as administrator". Notes:
  • This worked for me using the Windows SDK v6.0A on Vista. It may also work for other versions and other operating system versions but I didn't test that.
  • The Fusion Log Viewer is also known as "Assembly Binding Log Viewer"

Monday, July 13, 2009

Silverlight 3 Tools for Visual Studio 2008

On July 07, 2009, Microsoft published the download for the "Silverlight 3 Tools" for Visual Studio 2008. You can find a short list of what is included in the package and the actual downloads here. Make sure you have Service Pack 1 installed for Visual Studio 2008. Some more stuff to play with!

Friday, June 05, 2009

Background Color of TextBlock in Silverlight 2

In a WPF application (as of .NET 3.5) you can set the background color for a text block as follows:
<TextBlock ... Background="Red" ...> </TextBlock>
Despite being correct Silverlight 2 doesn't like this XAML code. Trying to set it programmatically leads to an exception. Therefore a different solution is needed. Here is what works in my case. I use a Canvas and place a Rectangle and a TextBlock inside of that Canvas. Unless you set the ZIndex use this order so that the TextBlock is in front of the Rectangle. I use the Rectangle as the background for the TextBlock. When the TextBlock changes its size I update the size of the Rectangle accordingly. This solution is pretty simple in the end. First the XAML code:
<UserControl x:Class="Foo.LabelWithBackground"
    xmlns="http://schemas.microsoft.com/winfx/2006/xaml/presentation"
    xmlns:x="http://schemas.microsoft.com/winfx/2006/xaml"
             Width="200" Height="20">
   <Canvas>
      <Rectangle Name="_labelBackground" Width="20" Height="20"
                 Fill="LightSkyBlue"/></Rectangle>
      <StackPanel>
         <TextBlock Height="20" HorizontalAlignment="Left" Name="_label"
                    VerticalAlignment="Center" Padding="4,2,4,0" 
                    Text="The Label Text" MinWidth="20"></TextBlock>
      </StackPanel>
   </Canvas>
</UserControl>
Next the C# code-behind:
public partial class LabelWithBackground : UserControl {
   public LabelWithBackground() {
      InitializeComponent();
      _label.SizeChanged += LabelSizeChanged;
   }

   void LabelSizeChanged(object sender, SizeChangedEventArgs e) {
      _labelBackground.Width = _label.ActualWidth + 
                       _label.Padding.Left + _label.Padding.Right;
   }
}
Of course you can use this UserControl in either a page (Silverlight) or in a window (WPF). In both cases you will get a label with background.
Check out my blog on Agile Leadership

Thursday, June 04, 2009

WPF and Silverlight: Sharing User Controls

Both WPF and Silverlight share XAML as the language to describe the layout, look and feel of a user interface. So I thought. There are differences, though, at least for .NET 3.5 and Silverlight 2. And the differences are not only limited to the XAML code but also to the code-behind regardless of whether you use C# or any other .NET language. Sure I did know that Silverlight doesn't support 3D graphics (at the moment) and so I didn't expect those to work. I'm also aware that Silverlight has a Visual Style Manager that is not available in WPF. And the root element in Silverlight is a Page while in WPF it is a Window. And Silverlight is more than just the UI part since it also represents a minimum CLR runtime environment and not a full .NET 3.5 implementation. So my expectations were along those lines. But I discovered more beyond my expectations. Small, yet sufficient differences that makes it hard to share UI components between WPF-based and Silverlight-based applications. And that's what I'd like to do since I want to leave the choice between using a native user interface and a rich internet application (RIA) to my customers. To reduce the gap I'm using I'm using components from the Silverlight tool kit that are in the "stable" band. Otherwise I wouldn't have available components such as TreeView. One example of a noticeable different is that in WPF a TextBlock can have an attribute named "Background" while in Silverlight you will get a parse error of you try to render the XAML code. There are also inconsistencies (or differences) in terms of how mouse events are handled. For instance the set of PreviewMouse* functions that are available in WPF don't exist in Silverlight 2. If you want to use Hittest() in your code-behind it won't work (or even compile) in Silverlight. Instead you have to use functionality of the VisualTreeHelper class. There are quite a few of these difference at the moment and I'll provide more details as I discover them along with code examples. My hope, though, is that over time the differences between the two are reduced at least for the features they have in common. It's pretty annoying that setting the background color is different between WPF and Silverlight. It's also pretty annoying that finding a component at a mouse cursor position is different. Maybe .NET 4.0 and Silverlight 3 are a step towards easier sharing of user controls. The community would love to see that!
Check out my blog on Agile Leadership.